


How to install Lightroom Presets on iOS?

Here is a detailed instruction on how to install Lightroom Presets on iOS phone. There are step by step screenshots to make the whole process smooth and easy, without any unexpected surprises.
Let's start! If you haven't done this before, it shouldn't take more than few minutes.
1. DOWNLOAD FREE LIGHTROOM APP
In the App Store find Lightroom Photo & Video Editor, download it and install. You can subscribe to a premium, paid version of this app but free option is absolutely fine.

2. DOWNLOADING LIGHTROOM PRESETS
After purchase, you will receive an email with download link. Click it and you will find a list of DNG files (or a ZIP file if you bought a bundle). Tap each one and Download to your phone.


If you don't know how to find a file you've downloaded to your iPhone, click the downward arrow in the top right corner to localize the files.
Other way to find them is to search Files app on your iPhone. Open it. You will find a folder "Downloads" with all the recently downloaded files.
 .
. 
Preset files are blank, but that's totally normal. They can be previewed only in the Lightroom App.
If you downloaded a ZIP file, just tap it to unzip into a folder with DNG files.
3. CREATE NEW ALBUM
For the best way to keep your Lightroom app well-organized, we strongly suggest establishing a separate album specifically for your Lightroom Presets. This will help you to keep all presets in one place and prevents any confusion with other images. Click "Lightroom" icon at the bottom of the screen, then choose "All photos" at the top and click "Create new" to make a new album.


4. IMPORTING PRESETS TO THE LIGHTROOM
To install lightroom presets, check if Lightroom icon is selected and you are in "All photos" folder.
Click the blue "+" icon in the bottom right corner and choose "Files".
.  .
. 
Localize the folder where you saved your files. Usually it's "Downloads" folder. Select all the preset files and tap "Open" to import the files you your folder.

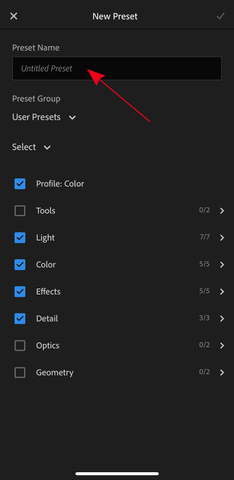
4. CREATING PRESETS
Click one of the files and then "..." in the top right corner. From the dropdown menu choose Create Preset. Type its name.
 .
. 
You have to repeat this step for other presets for your pack. And done!
5. USING PRESETS
To apply the preset, open the photo you want to edit, slide across the bottom menu. Tap "Presets" icon and under Yours -> "User Presets" you will find all the presets you’ve already added.
You can switch between them and pick the one you like most.
Fine-tune the preset's strength by tapping on the preset image icon once more, and then slide the adjustment bar to the left or right. Once you're satisfied with the outcome, simply tap the checkmark located in the lower right corner.
 .
. 
After applying the preset you can leave it as it is or treat it like a base and play with other settings from the bottom menu like Light, Color, Effects or Details. All is up to you so have fun!
To browse all the amazing lightroom preset packs we created, click here: Mobile Lightroom Presets.
Happy editing!